A big pain for most people is to figure out how to take better pictures for their eBay and Craigslist listings. The key to making pictures attractive isn’t terribly difficult. The biggest things you need to make sure you do when shooting images is that you 1. show everything that will be included in the sale (in one shot — commonly called a master or primary shot) in ways that make potential buyers WANT to see more; 2. do closeup shots of any of the major pieces that make up the item you’re selling; and 3. color-correct your photos. This will really boost your chances for selling the item at higher-prices than the rest of the classifieds or auction listings.
The Master (or Primary) Shot.
In the master shot, it’s best to commonly show all of the items you’ll be selling in your eBay or Craigslist post. It’s normally best to take the picture of the items at an angle to give it more depth. However, many people use a tablecloth or blanket to background their images. Not really the best idea. The wrinkles or texture in the background can sometimes conflict with the actual item you’re selling. It’s normally better to use your floor or countertop as it will represent a more consistent surface making the item stand out to potential buyers. Here’s an example of the way to ‘frame’ (a.k.a. compose the shot in the camera) a master shot for an Apple iPod Shuffle.
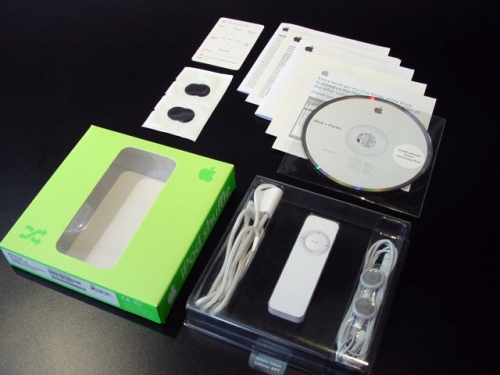
This shot was taken on a countertop. Notice, in the master shot that ALL of the pieces that will be included in this eBay or Craigslist sale are shown nice and neat. Now I’m not a professional photographer, but it just takes a couple extra seconds to lay the pieces out this way and the impact is much better with your buyers.
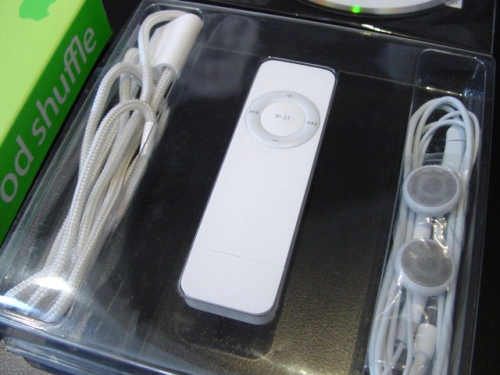
Closeup shots of the pieces
Now that the primary photo is taken, make sure to shoot closeups of each of the major pieces being included in the auction or classifieds listing. If your camera has a ‘macro’ setting (which sometimes is a little flower-like button on the camera), enable that before shooting. What this does is disable your camera’s longer-range auto-focus to make things close to the lens appear clear. Normally an item will have 2-3 closeup shots to go along with the master shot. Here’s an example:
Color-correct your images
What does this exactly mean??? Well, to color correct your images, you set the levels so blacks seem black and whites seem white. On Adobe Photoshop is simply Apple-Shift-L. BUT, if you don’t have Photoshop and don’t want to shell out several hundred bucks for it, you can use the integrated photo editor in WipBox (yep the shameless promotional plug finally comes). When you edit your photos from your item, WipBox has the ‘enhance’ setting enabled by default auto-leveling the image. Just hit continue to save the auto-levelled image.
If you use these techniques, you’ll end up getting buyers to look more at your listings and end up getting higher prices than by not (on average — nothing’s ever guaranteed though :).